
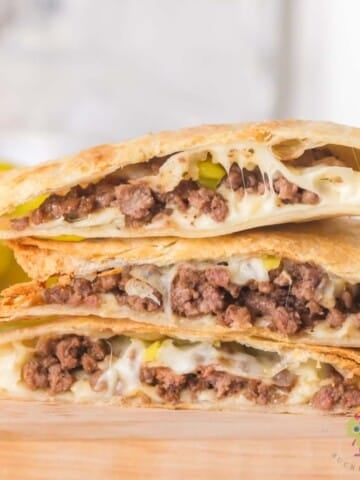
When you know you know, showing up late to the BBQ, means no burnt ends, here is the solution chuck roast burnt ends. Grab a nicely marbled chuck roast…
✨Season✨Smoke✨Rest✨Cube✨Sauce✨

Traditionally burnt ends are the little crispy bits that come off the point when cooking a whole brisket low & slow. Unfortunately, you get too few of these little pieces of BBQ gold.
Recipe Highlights
Beyond the recipe: Chuck roast is a flavorful cut of beef and is budget-friendly. It is so tasty as a Mississippi roast to shredded in tacos.
Equipment you will need: A smoker or BBQ with an indirect cooking method.
Time for this recipe: You can get this done in 6 hours, but I find letting the chuck roast dry brine overnight in the refrigerator is worth it.
Servings: One chuck roast fed the 4 of us. The two roasts as an appetizer are good for up to 16 people.

My family loves burnt ends but there is never enough. So after a little searching, I came across chuck roast burnt ends. We use chuck roast for all sorts of recipes so this made complete sense to me. Let me show you how I smoked two chuck roasts to make burnt ends.
Jump to:
Poor man’s burnt ends
Burnt ends are one of those secret pleasures you get from smoking a whole brisket. To get more of these burnt ends, start by cooking a chuck roast like a brisket. The bonus here is the chuck roast is more economical and quicker to cook than the whole brisket. Each starts on the grill grate, but instead of waiting for the higher temperature in a brisket, you wrap the chuck roast sooner. Once the chuck roast is done, you cube it. Add the burnt ends sauce and now you have made poor man’s burnt ends. Trust me, make a lot. Your family and friends will be asking for seconds or thirds. Keep reading down to the recipe card for more information. Interestingly, you can even do this recipe in the oven if you have the smoker or BBQ cooking something else.
Ingredients
- Two chuck roasts
- Go-to BBQ rub
- Burnt ends sauce: BBQ sauce (your favorite), brown sugar, and butter.
Check out the printable recipe card at the bottom of this post for details on ingredients and instructions.

Grill master notes
- When shopping for a chuck roast, look for one with good marbling, this will help keep the burnt ends moist and tender. I always look for one that is over 2 inches thick.
- The chuck and brisket are different primal cuts and it is important to remember this. You have to balance getting a bark on the chuck roast while maintaining moisture. This is why I wrapped it sooner. A brisket can handle a longer cook without drying out and can be wrapped or kept unwrapped during smoking.
- The chuck roast can easily be prepped the night before to over 24 hours ahead with the dry rub in the fridge.
- Charcoal BBQers, I prepare mine the night before. So all I need to do is light the BBQ and get smoking while enjoying my coffee.
- To add more aromatics and moisture to the cook use a catch pan with that cook’s seasoning and water.
Instructions
This is a great first-smoking recipe. All you need to do is season the chuck roast, smoke, rest, cube, and sauce. Congrats you’ve made poor man’s burnt ends.

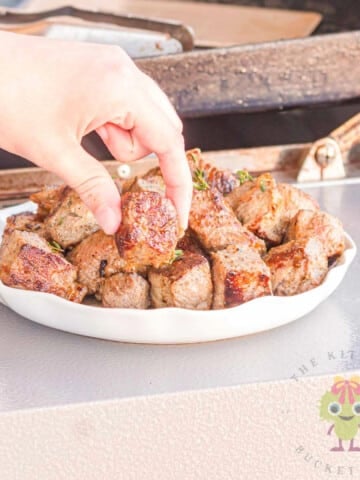
Step 1: After dry brining with our Go-to BBQ rub, bring the chuck roasts out, and place them in a 250°F smoker/BBQ.

Step 2: Smoke until a nice brisket-like bark, about 160°F. Wrap each chuck roast.

Step 3: Time to make the burnt ends sauce for the finished cubed chuck roasts.

Step 4: Place in a pan, add burnt ends sauce, and smoke until caramelized.

Step 5: Remove from the smoker/BBQ and enjoy.
Scroll down to the recipe card for exact quantities and instructions.
What to serve with burnt ends
Chuck roast burnt ends are a flavorful and versatile dish that can elevate any meal.
- The burnt ends as the main dish go great with any of our quick side dish recipes like waffle fries, twice-baked mashed potatoes, and French onion potatoes.
- If you’d like to keep all the cooking outside make some smoked baked potatoes or our twice-baked potatoes. They pair beautifully with the poor man’s burnt ends.
- If you are doing a big cookout here are some crowd favorites to go with the burnt ends: smoked crispy chicken wings, smoked drumsticks, and smoked sausages.
- Finally, the chuck roast burnt ends work great as an appetizer at your next cookout with sides like coleslaw, macaroni salad, and potato salad.

Equipment
- Smoker or BBQ (Oven, too.)
- Catch pan
- Remote meat thermometer
- Disposable aluminium pan (10 by 14)
- Heavy duty aluminum foil
Storage / Reheat / Leftovers
- Storage: I’m not sure you will have any left, but if you do they fridge up great for about 4 days. I put ours in an airtight container with any remaining burnt ends sauce.
- Reheat: I like the air fryer for reheating them, 350°F for 5 minutes or heated to your liking. If you want to shred them to add to tacos or sliders, simply use the griddle to warm them up while pulling them apart.
- Leftovers: The next day, I made a slider on the griddle with a few pieces and a grilled bun. Another favorite is to use them in quesadillas or nachos.
FAQ
Yes, you can. However, you may run the risk of drying out the chuck roast. Keep an eye on the level of bark you want and don’t go over 165°F internal temperature.
Yes, the key will be having an indirect cooking method and being able to see how the bark is forming. Then just follow the internal temperatures and get the lid closed as quickly as possible after opening.
Yes. The important thing is to have enough salt in the rub. Our tangy lemon pepper dry rub, classic sweet BBQ rub, or the sweet & tangy rub are great options.
Beef it’s what’s for dinner


Dessert anyone


What do you think of the chuck roast burnt ends? Please leave us ⭐⭐⭐⭐⭐ in the review below and tag me @thekitchenbucketlist on Instagram, Facebook, Pinterest, and YouTube!

📖 Recipe

Chuck roast burnt ends
Equipment
- Smoker or BBQ (18-inch) with indirect cooking method (Oven, too.)
- Catch pan
- Remote meat thermometer with sensors
- Heavy duty aluminum foil
- Disposable aluminum pan (10 by 14)
Ingredients
- 2 chuck roasts
Go-to BBQ rub
- 1 tablespoon salt
- 1 tablespoon garlic powder
- 1 tablespoon onion powder
- ½ tablespoon ground black pepper
- 1 teaspoon celery seed
- 1 teaspoon smoked Paprika
Burnt ends sauce
- 1 cup BBQ sauce (Your favorite)
- ½ cup butter (Stick of butter)
- ½ cup brown sugar
Instructions
- Unpack the chuck roast and pat dry with a paper towel. Place on a tray to be rubbed and dry brined.
Make Go-to BBQ rub and dry brine
- In a bowl combine the salt, ground black pepper, garlic powder, onion powder, celery seed, and smoked Paprika and mix well to make our Go-to BBQ rub.
- Coat the chuck roasts with the rub and place in the refrigerator for at least an hour to dry brine.NOTE: We had some of the rub left. I added it to the drip pan with water. See below. Our chuck roasts dry brined overnight in the fridge for about 20 hours.
Time to smoke
- Smokers select your wood, I used maple and set the temperature to 250℉. BBQers use an indirect cooking method and get the BBQ stable at 250℉.
- I use a drip pan full of water and the remaining Go-to BBQ rub for additional aromatics. I place mine under the grill grate.NOTE: Smokers you can use any heat-proof container on the grill grates to do the same thing.
- Once the smoker or BBQ is stable at 250℉ bring the two chuck roasts from the fridge. Place them on the grill grate and close the lid. If you are using sensors place one in each roast, before placing them in the smoker or BBQ.
- After 3 hours the chuck roasts had reached 160℉ and 165℉ internal temperatures. Each had developed a nice bark. It looked similar to a brisket.
Wrapping, resting, and cubing the chuck roasts
- Time to wrap the chuck roast. I remove one at a time and close the lid in between so the BBQ maintains a stable temperature. I use two layers of heavy duty aluminum foil for each.
- Once the wrapped chuck roasts are back in the smoker or BBQ continue cooking until 195℉ to 205℉ internal temperature. This took about 1½ hours at 250℉. My bigger one was at 203℉ and the smaller one was at 197℉ when I pulled them.
- Rest the two wrapped chuck roasts for 30 minutes in the aluminum foil.
- Remove each chuck roast and cut it into big bite-sized pieces to make the poor man's burnt ends. Place them in the aluminum pan and add the au jus sauce from the aluminum foil wrappings.
- Time to start the burnt ends sauce by pouring the BBQ sauce, sprinkling the brown sugar, and placing the sliced stick of butter (8 tablespoons) over the cubed chuck roasts.
Back out to smoke and caramelize
- Place the pan with the chuck roast pieces back in the smoker or BBQ. Cook for 15 minutes to melt the butter. Take the pan out and close the lid. Mix the pieces to coat with the burnt ends sauce. Place back in the smoker or BBQ and continue to smoke for 45 minutes.
- Remove the chuck roast burnt ends from the smoker or BBQ and serve. Enjoy them all on their own as a meal, appetizer, or even in a bun as a sandwich.
Notes
- Chuck roasts were each over 2 inches thick weighing 3 lbs. and 2 ¾ lbs.
- Bark vs Temp: Since this is a chuck roast you can wrap sooner than a brisket if you have the bark you want for the poor man’s burnt ends.
- Oven cook, it is done in the same way as above, without the smoking wood. I would advise a large drip pan with water to catch all the drippings.


Cara Leonard says
Looks so good! Saving this recipe!
Jess says
I had never heard of this before reading your post, but now my mouth is watering and I’m pretty sure I need to make this ASAP! This looks amazing. Thanks for sharing the recipe!
Sean says
It is a great cook for the BBQ. Let us know how it goes. And enjoy!